What Is IP Whitelisting, and Why Is It Now Mandatory on Bitsgap?
Protect your Binance crypto trading account with IP Whitelisting — the must-have cybersecurity defense. Learn how it works and its benefits now.
Starting January 2023, it’s mandatory for our users to whitelist Bitsgap IPs on several exchanges that support this function. IP Whitelisting prevents scammers from your trading account and guarantees that trading happens from only authorized IP addresses.
With phishing attacks at an all-time high, extra layers of protection against bad actors are a cyber must for anyone wishing to boost their defenses. So, how does IP Whitelisting work? How much protection does it offer, and what are its benefits? Let’s break it down.
Whitelisting: Brief Overview
A whitelist is a security list that restricts access to only pre-approved emails, applications, IP addresses, etc. Everything on the list has access to system resources, while everything else is denied access.
If any application attempts to access the network resources, the system checks that application against the whitelist and only allows access if a match is found.
👉 For example, when you sign up for a particular newsletter, a mailing company might ask you to add their email address to a list of trusted addresses, so those emails don’t go to your spam folder.
Similarly, at a cryptocurrency exchange, you may whitelist several withdrawal addresses as an extra security measure to restrict the withdrawal of funds from your account to only a handful of trustworthy addresses.
You may have guessed that the opposite of whitelisting is blacklisting, which, in turn, blocks access to specific programs, websites, or services.
What is IP Whitelisting?
An IP whitelist is an approved list of IP addresses that have permission to access a particular system or network. Cryptocurrency exchanges use IP whitelisting to restrict access to your account to only trusted, verified IP addresses.
For example, when creating API keys to connect your Binance account with Bitsgap, you must specify a list of Bistgap’s addresses to ensure your encrypted API keys can only be accessed from Bitsgap’s authorized servers. Anyone who tries to use your API keys from other than whitelisted IP addresses will be blocked.
Each user receives their own list of addresses to add to an exchange. These are the addresses of the servers that will transmit trading commands on behalf of the user.
Benefits of IP Whitelisting
The main purpose of IP whitelisting is relatively straightforward — to prevent unauthorized access to your account and protect your trading from malicious activity. By adding Bitsgap’s IP addresses to your exchange, you ensure that no one can ever use your API keys (even if compromised) from addresses not associated with Bitsgap.
Another benefit of IP whitelisting is the protection of trading permissions. If you’ve been reconnecting your exchanges with Bistgap f.e. due to expiring API keys, whitelisting will allow you to keep Bitsgap connected to your exchange account without expiration.
👉 Not only will your APIs not expire, but they will gain an extra layer of security — whitelisting denies access to unauthorized IP addresses.
In fact, your exchange API connection may not work at all if you haven’t whitelisted Bitsgap IP addresses. If so, you’ll see an error message [No Trusted IPs].
This is done for safety reasons to ensure the connection between your exchange and Bitsgap is fully secured. To fix the error, you can either use Fast Replace (recommended) or manually add Bitsgap’s IP addresses to the trusted IP list on your exchange.
Why Whitelist?
Whitelisting binds your API key with Bistgap’s authorized servers. If anyone tries to log into your exchange account with the same API key but from a different IP address, they will be automatically blocked.
👉 This ensures the safety and security of your funds, trading activity, and personal information.
Suppose you decide to bypass whitelisting IPs. If your API key is compromised, leaked, or otherwise revealed to bad actors, they might want to take advantage of it and log into your exchange account with this API key from any other service. Then, they can try to withdraw funds, perform countertrade activities, and squander your savings in any other way possible.
How to Whitelist Bitsgap IPs
By enabling whitelisting, your exchange will only accept requests from the IP addresses you’ve provided — IP addresses that represent Bitsgap’s servers.
You need to whitelist Bitsgap IPs either when you connect to the new exchange or if you get the system error “No Trusted IPs” on the platform. To whitelist IPs, first, go to Bitsgap → My Exchanges. Choose [+Add new exchange] if you want to connect a new exchange, [Extend] or [Renew] if you wish to extend or renew your API keys in case of mentioned error.
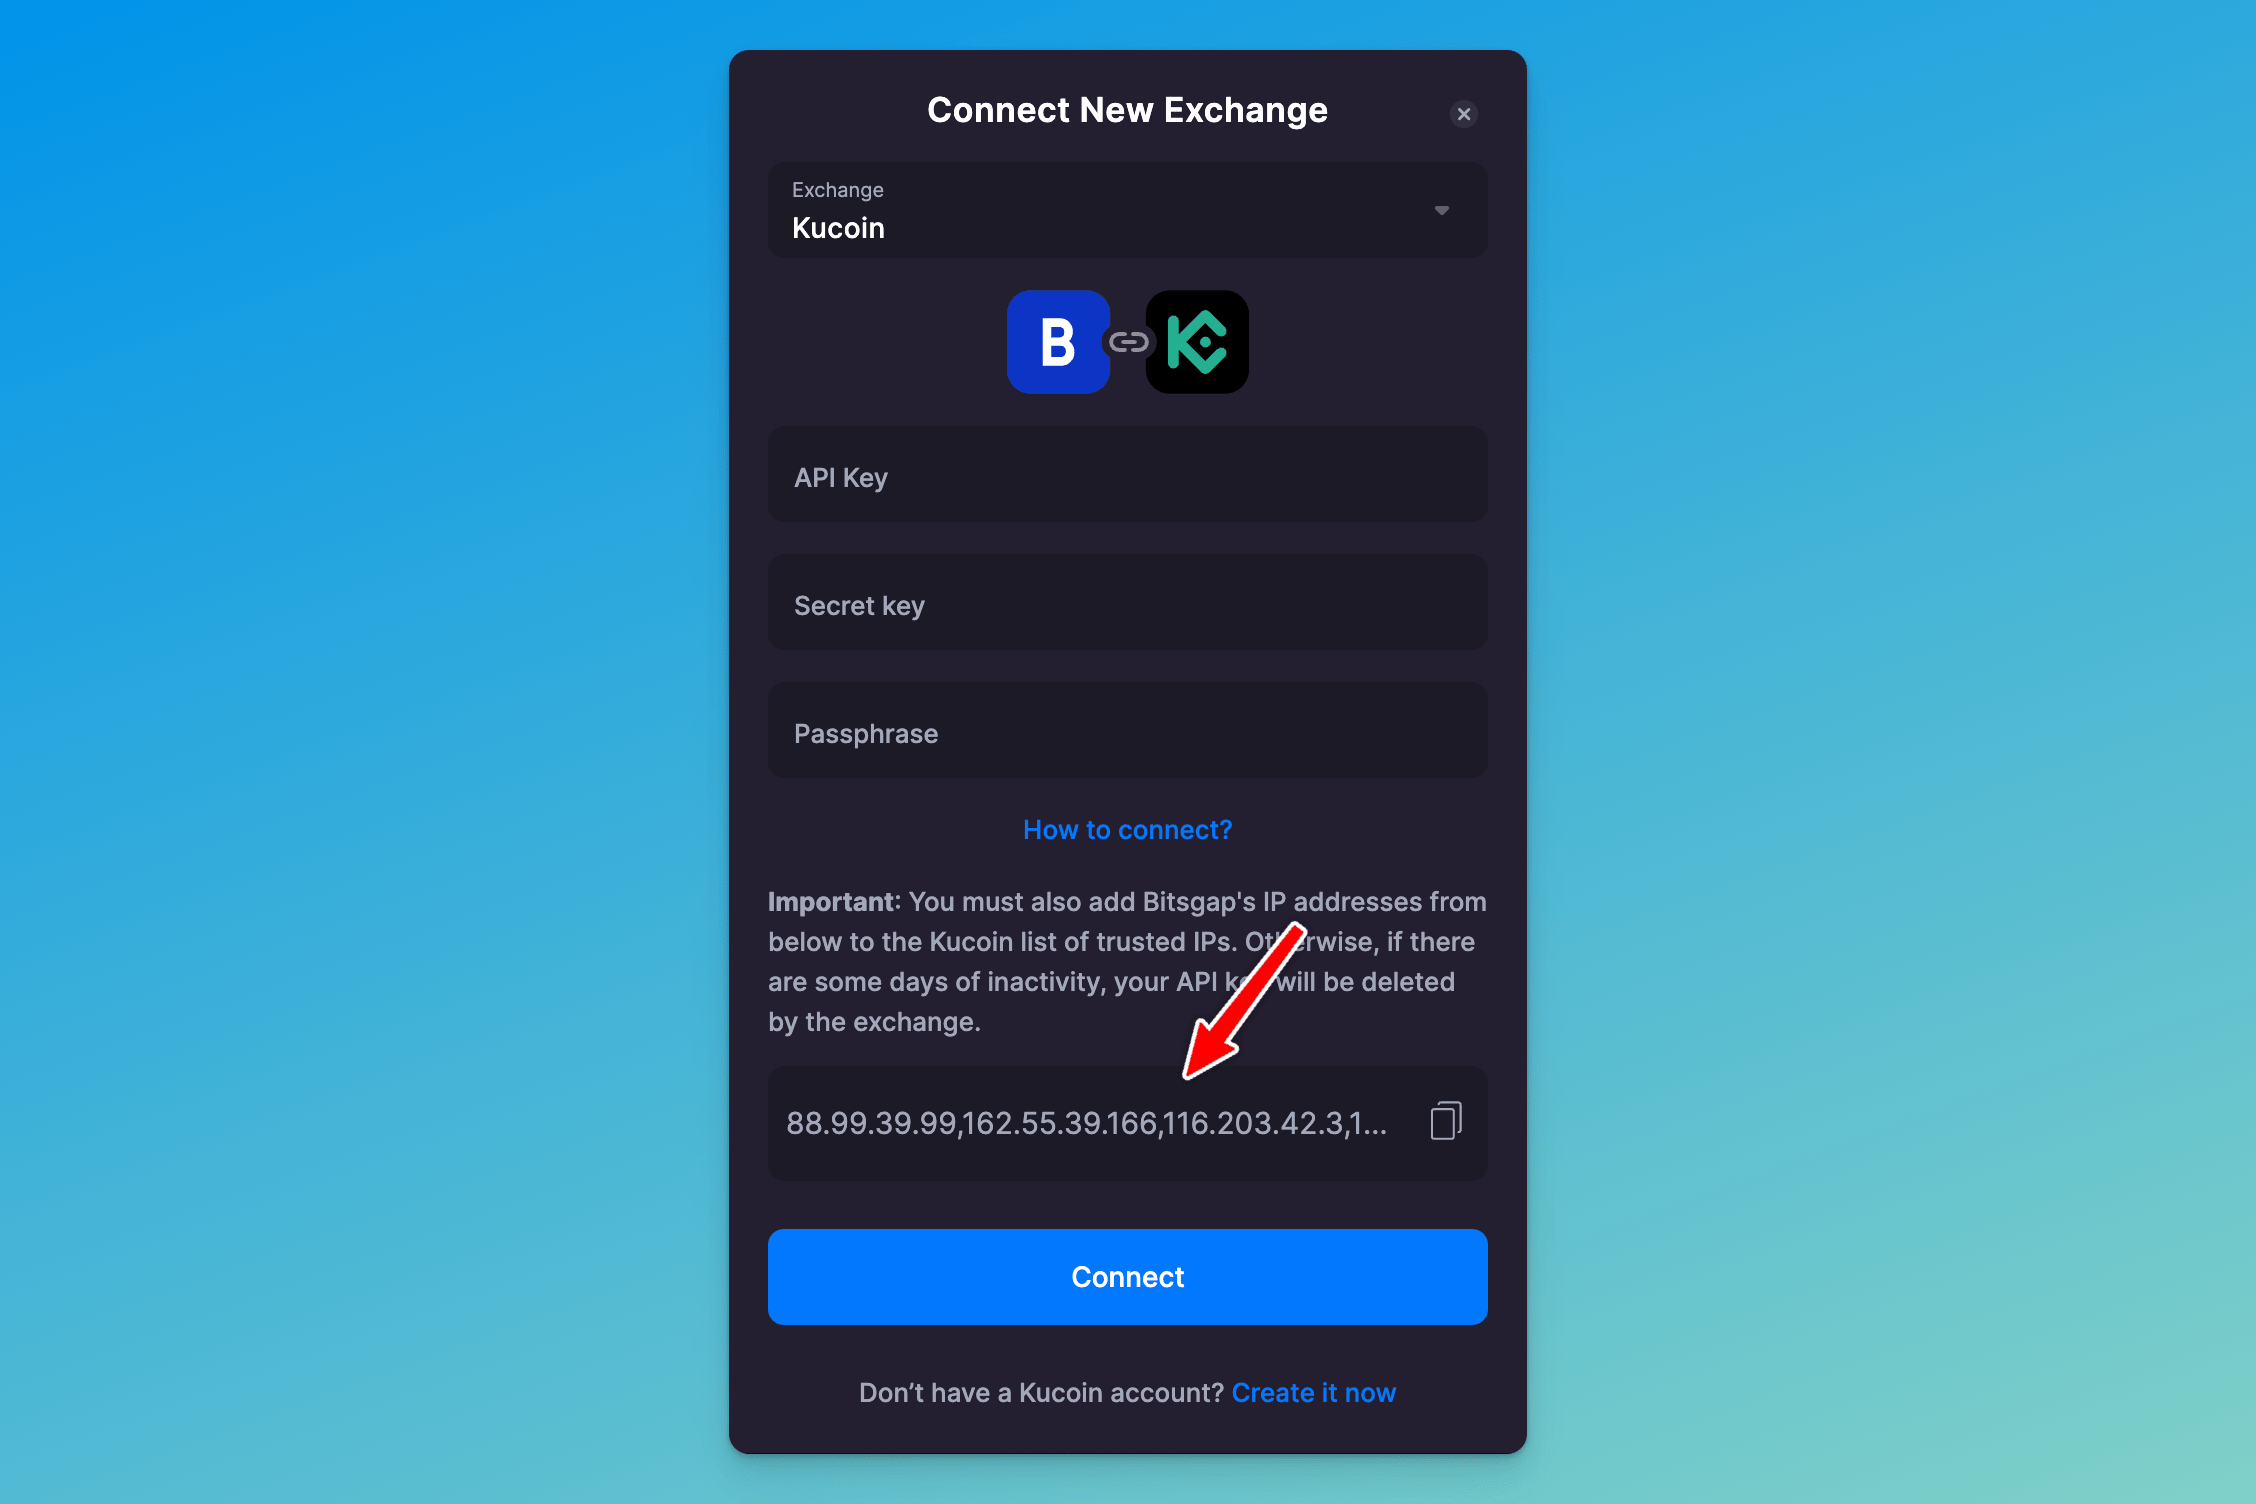
Currently, IP whitelisting is mandatory for the Binance, Kraken, and Kucoin exchanges. For example, if you want to add the Kucoin exchange, you’ll need to click on [+Add new exchange] and choose Kucoin from the list of available exchanges. Now, copy the list of authorized IP addresses (Pic. 1) and go to the Kucoin exchange.

Log into your Kucoin account and navigate to the API management page from your account settings in the top right corner of your interface. If this is your first sign-up at the KuCoin exchange, you’ll be asked to set up two-factor authentication (2FA) and a trading password.
- Click on [Create API], give your API a name, create an API passphrase, and store the phrase somewhere safe because you’ll need it later.
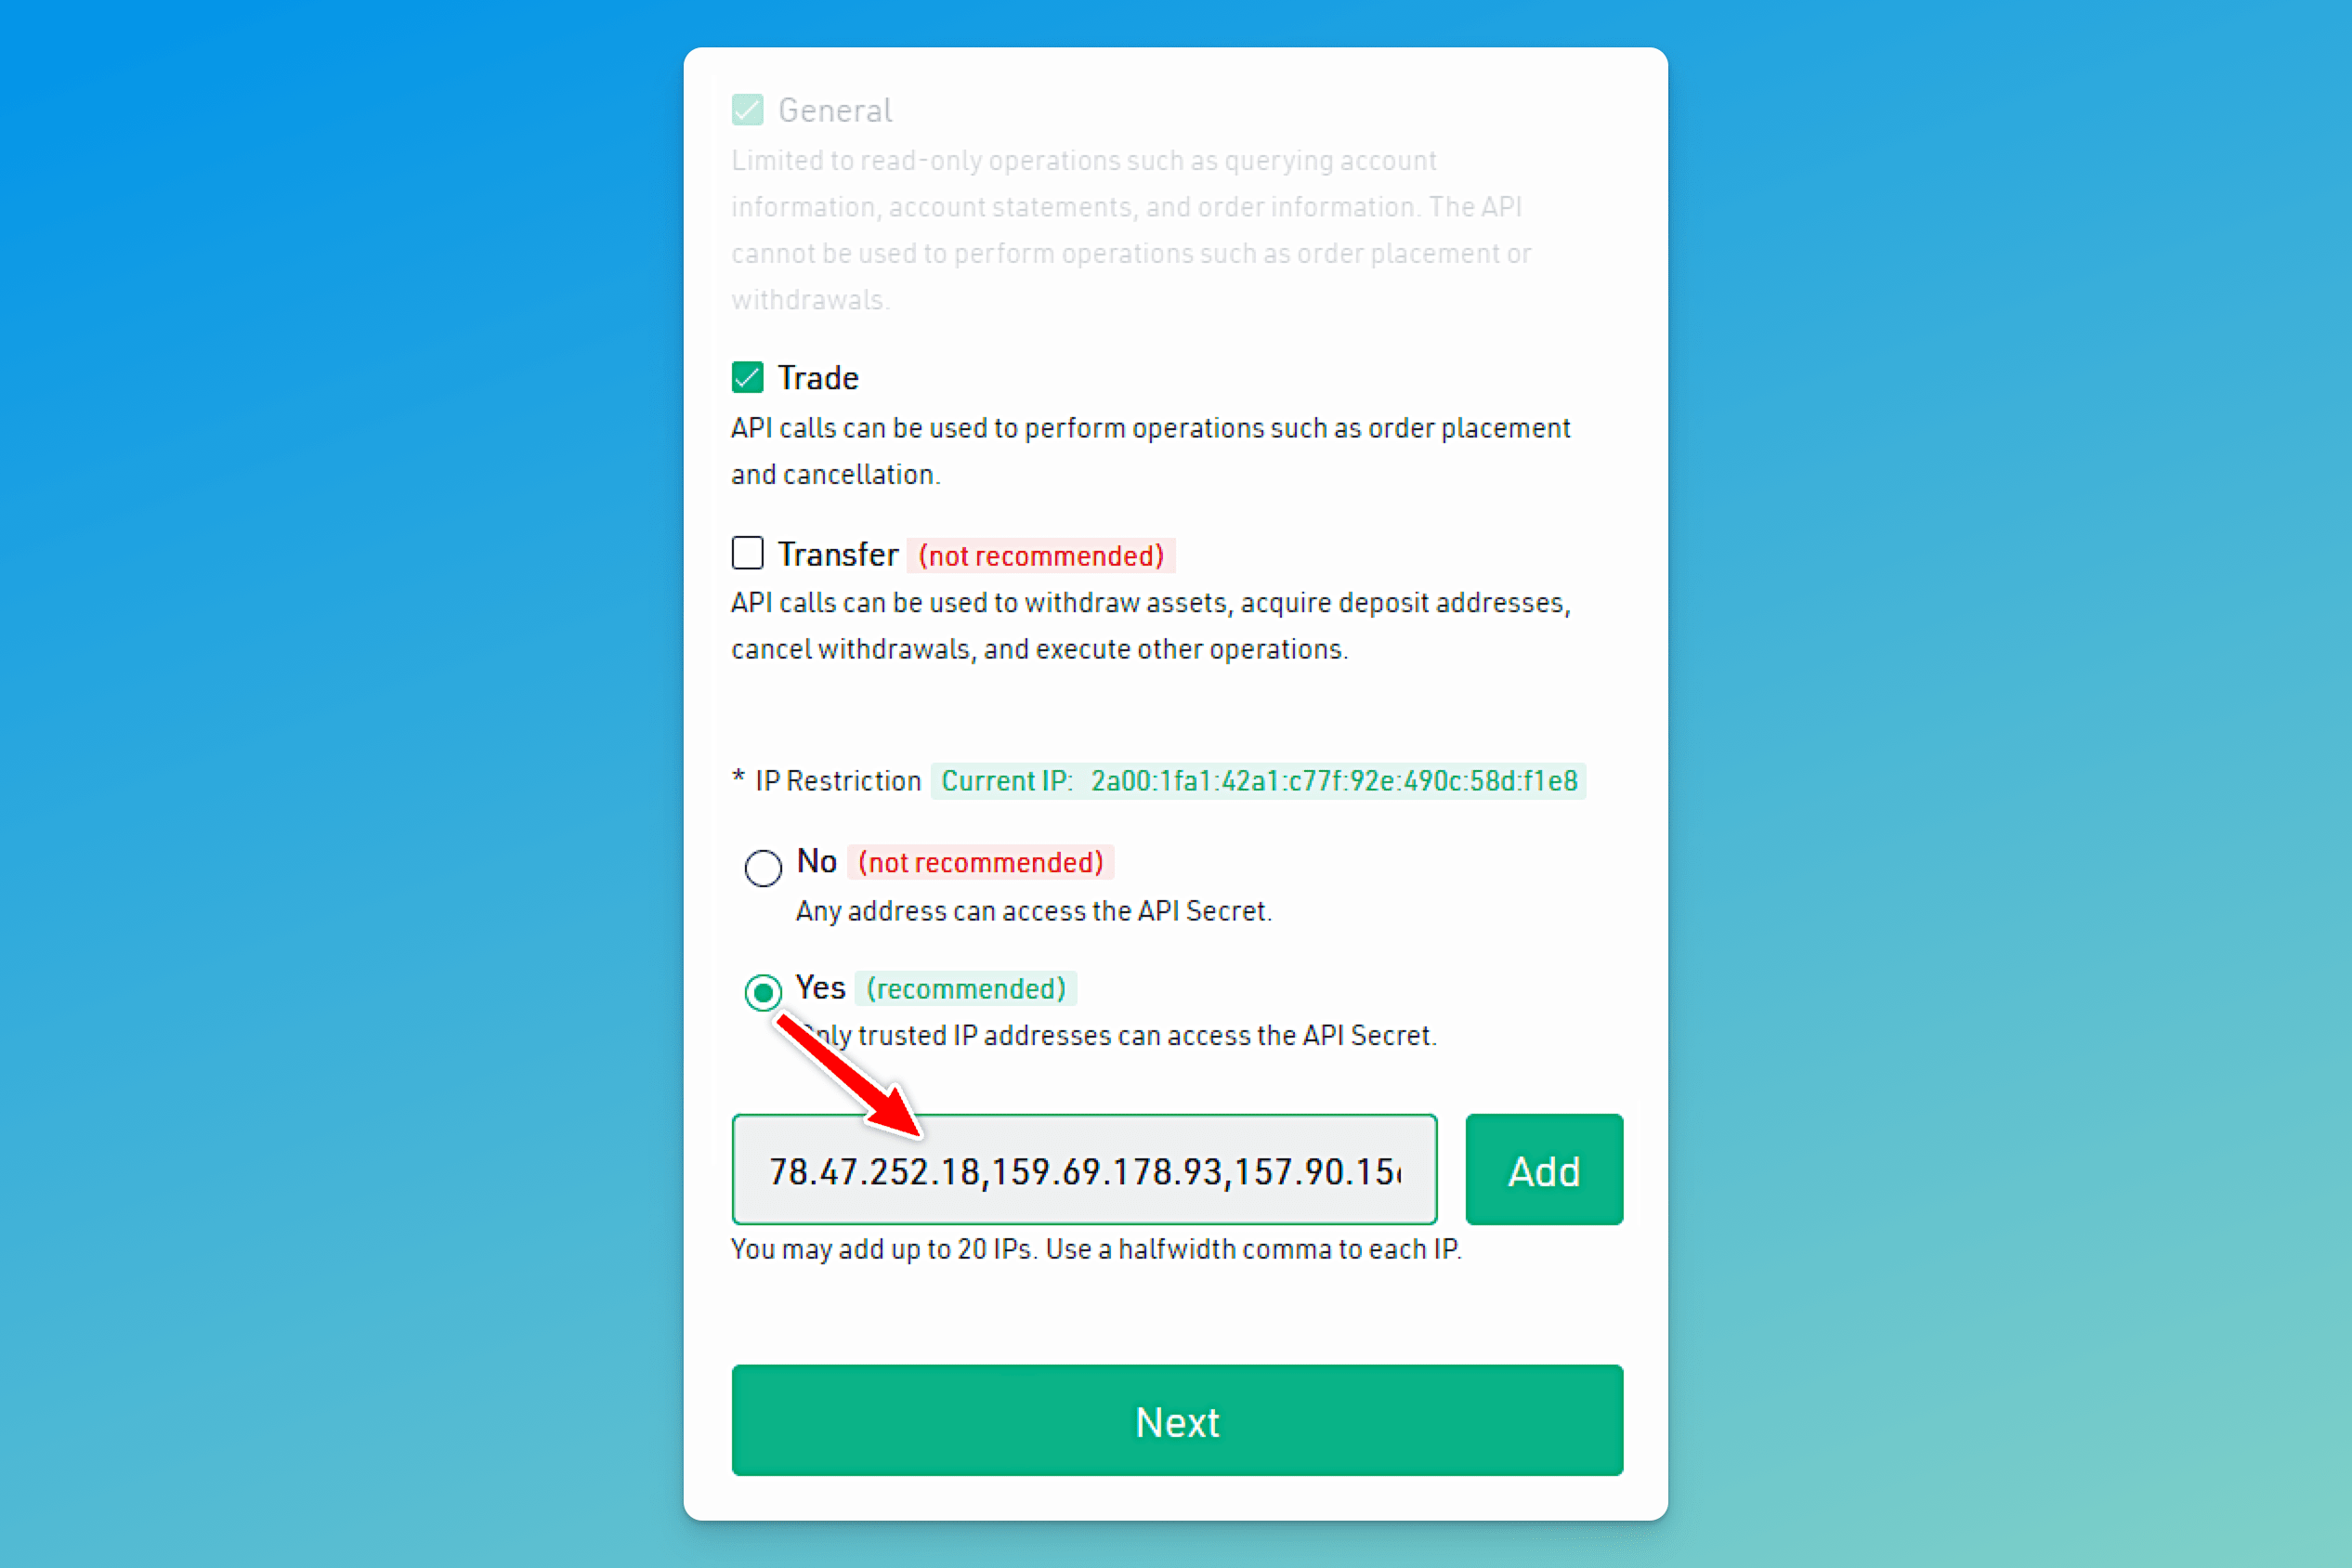
- Then, edit your permissions, so that [Transfer] is unchecked (off). Select Yes for [IP Restriction] (Pic. 2) and paste Bitsgap’s IP addresses that you copied earlier.

- Hit [Next], insert all codes for the security verification and click [Confirm].
- Then, copy your API key and Secret key and go back to Bitsgap → Exchanges → [Add new exchange] → Kucoin to paste both and click [Connect].
- Bingo! You’ve added a new exchange and whitelisted Bistgap’s IPs on Kucoin.
If you want to learn how to whitelist Bitsgap’s IPs on the Binance exchange, please read this article on Help Center.
Here Is the Best Alternative: Fast Connect
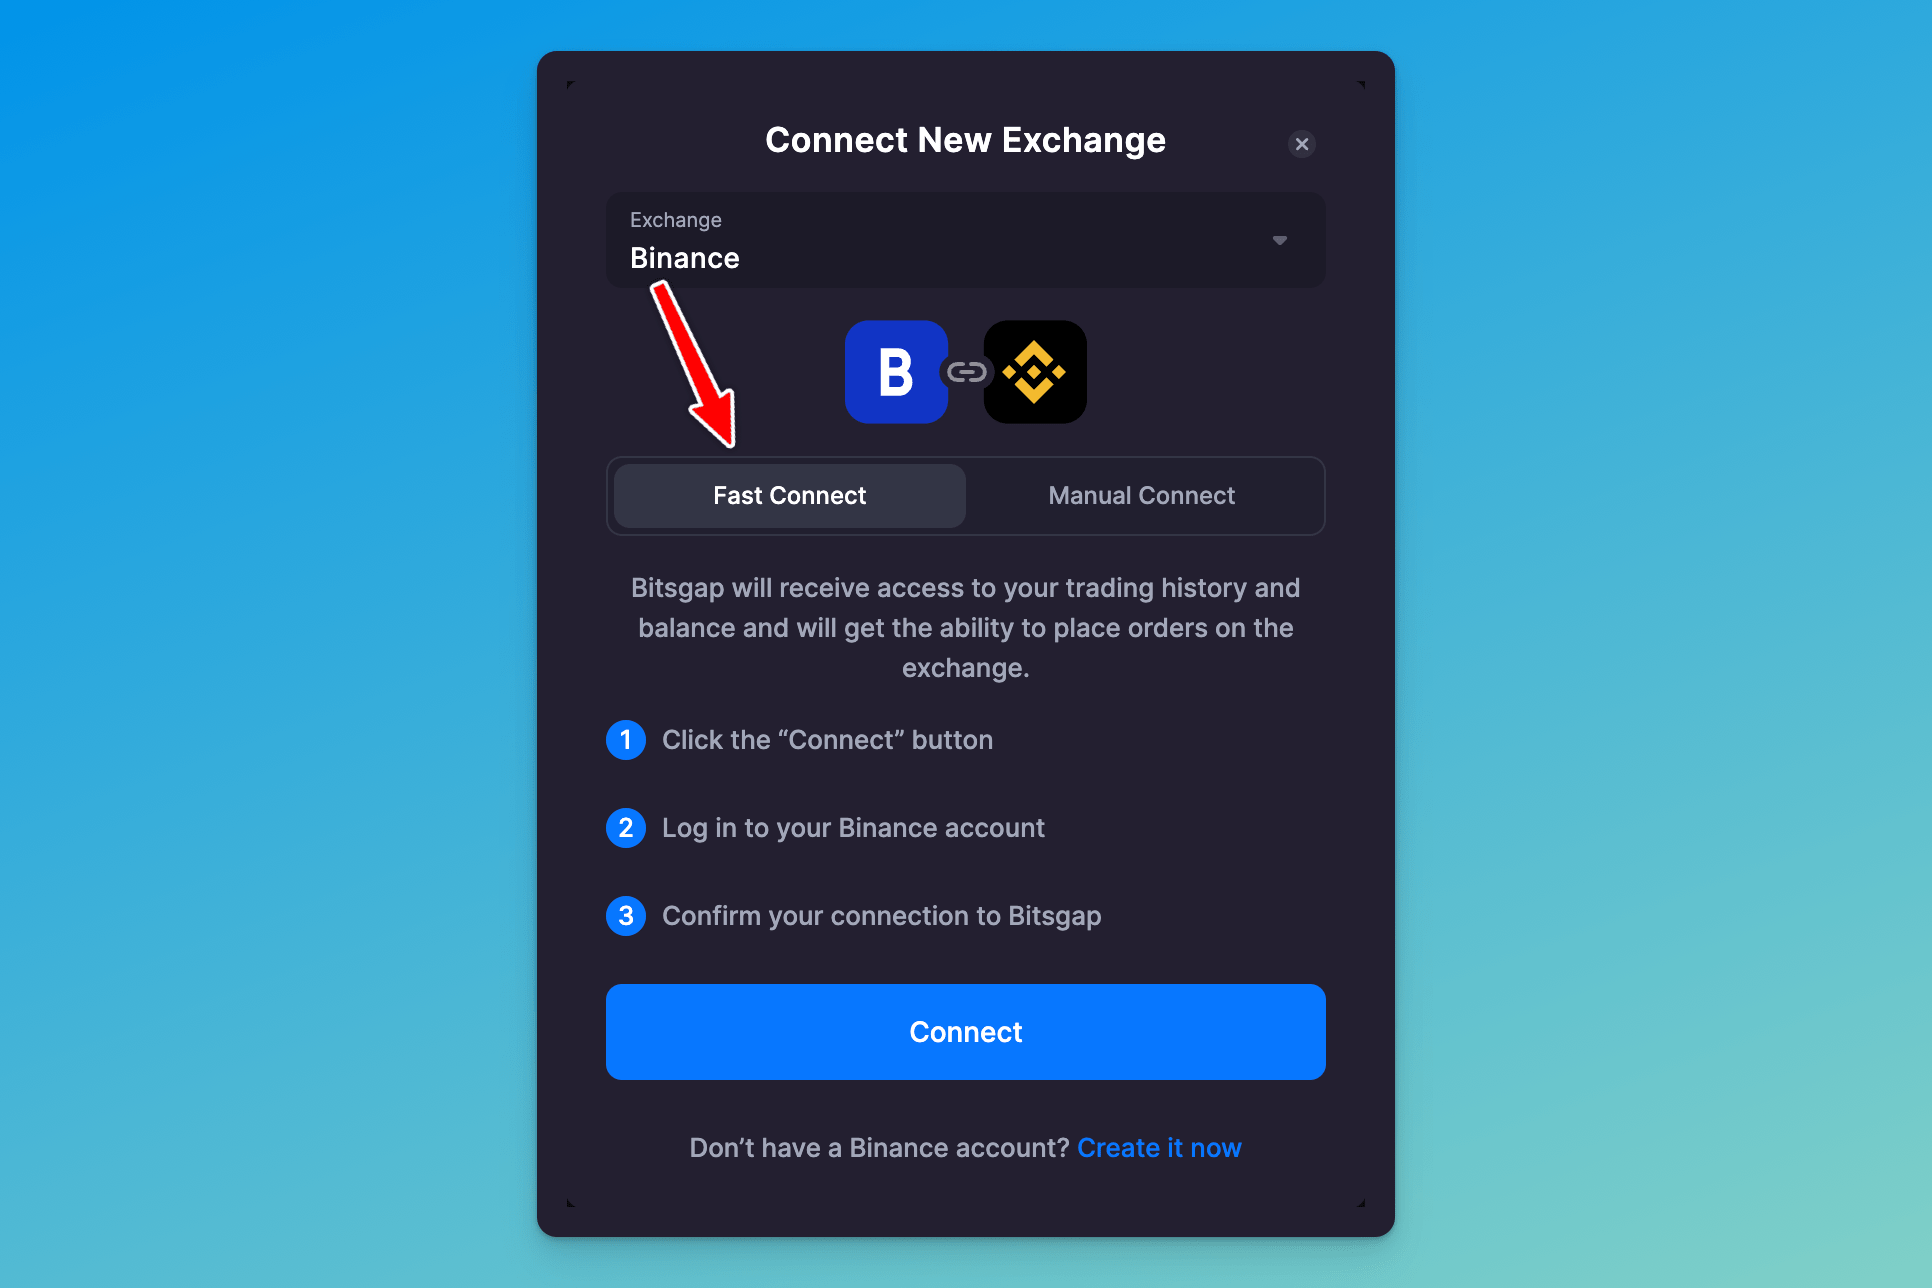
For exchanges like Binance and OKX, Bitsgap has a fantastic alternative to manual API key creation called Fast Connect (Pic. 3):

Firstly, it’s extremely easy to set up (it takes literally three mouse clicks). Secondly, it adds yet another layer of security to your accounts on both platforms. You already know the principle if you’ve allowed Google or Facebook to authorize you automatically.
👉 OAuth, an open standard for access delegation, allows users to grant access to their information on other applications without sharing private credentials like passwords. OAuth significantly improves trading security by automatically whitelisting Bitsgap’s IPs and allowing trading only from those whitelisted addresses.
Apart from being fast and convenient, Fast Connect (OAuth) doesn’t return any setup errors, protects your key with whitelisted IPs, and doesn’t transmit your API key anywhere but the exchange and Bitsgap in encrypted form.
If you want to learn more about Fast Connect, please refer to this article on our blog. Or ready to whitelist Bistgap’s IPs now and trade securely for years to come? Head to the platform now!
